Early photography
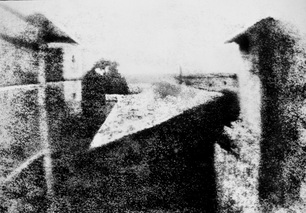
During the Renaissance (16th Century), artists became interested in exploring and representing the reality of nature. Leonardo Da Vinci was especially well known for his anatomical drawings, and was interested in contemporary advances in science. Artists have had to develop various instruments to gain the perfect perspective in order to achieve such realism. One instrument that artists used was the camera obscura, where an inverted image was projected onto a surface in a dark room. Over time, technology developed, creating the camera lucida, a smaller more controllable apparatus. In the 1800s, the industrial revolution transformed society with mass production vastly increasing into the future. In 1827, a scientist called Joseph Niepce succeeded in fixing the first projected image of his view from his window in Le Gras, South of France. Louis Daguerre assisted Niepce to fix the projected image. He was a painted of stage sets and illusionistic scenery for The Diorama (popular visual entertainment in Paris.) Daguerre officially announced his invention the Daguerrotype in 1839. It was a type of photo which was laterally reversed and monochromatic that got printed onto a metal plate. An English scientist called William Henry Fox Talbot developed another type of photography called the Calotype, around the same time as the invention of the Daguerrotype. Unlike the Daguerrotype, the Calotype could be produced as negative instead of being a single, unduplicated image. Talbot's Calotype was far superior in terms of mass production, however it lacked the sharpness and overall quality, which made it less popular in the early years. However over time, the Calotype was improved, and advances in paper technology led to better processing, making it become the most popular type of photography that's still used today. During the early years, many photographers were concerned with documentation and therefore continued to focus on traditional fine art themes such as portraiture and landscape. Over time this changed as photographers started to show their own identity, which set them apart from contemporary artists.
Photograms

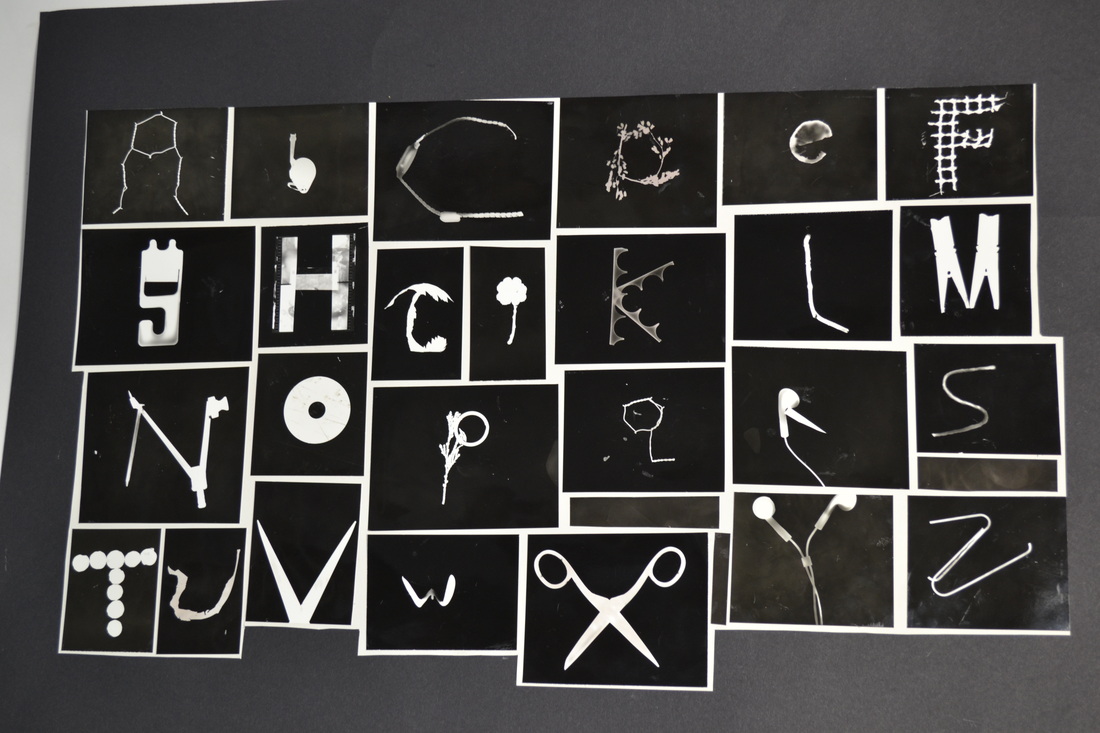
A photogram is a photographic print made by placing objects onto light-sensitive paper, such as photographic paper, and exposing it with light from above. Resulting in a negative, shadow image varying in tone (depending on the transparency of the objects used). Areas of the paper that have received no light appear white; those exposed through transparent or semi-transparent objects appear grey. Most photograms made in the 1800s were documentary experiments and it wasn't until the Modernist movement in the 20th century that artists started to make photograms as art works focusing on form, movement and space. Artists such as:
-Lotte Jacobi
-Lazlo Maholy-Nagy
-Man Ray
-Christian Shad
...Were part of the Bauhaus movement in Germany.
-Lotte Jacobi
-Lazlo Maholy-Nagy
-Man Ray
-Christian Shad
...Were part of the Bauhaus movement in Germany.
the alhapabet using photograms
Pinhole cameras
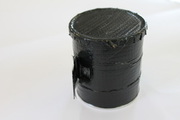
The pin hole camera is the simplest camera and is based on the camera obscura, which is a large room or container that has been blacken out except for a small hole of light. We made a pinhole camera using a pringles tin, black tape and black card. Firstly, we covered the inside of the pringle tin and lid with black card and tape to cover the reflective surface of the tin, to prevent light reflecting on to the image. We then cut out a square in the pringle tin, and covered the empty space with tin foil. Before taping the tin foil down, we made a tiny hole using a pin. Over the tin foil, we used card to make a lid so no light would get in. Then we put the photographic paper into the camera in the dark room, as to make sure there is no chance of any light reaching the paper. After the camera was made, we went outside and opened the lid revealing the hole in the tin foil, and counted the seconds we left it open for, (different lights needed different exposures). We then returned to the dark room to take out the photographic paper. It has to be left in the developer for 2 minutes, then in stop for 1 minute, fix for 3 minutes, and then dried off.
SANDWICH PRINTS
After we printed the negatives, we used the 'sandwich' technique to create positives. Firstly, we laid one of the negatives on top of a slightly larger piece of photographic paper. Then we left it for suitable exposure time, and printed it the same as we developed the negatives.
DYING/ TONING
To dye a print, we placed it in bleach for about 30 seconds in order to reduce some of the black. Then lay the print in sepia tone until it turns sepia. Similarly to the other prints, we then rinsed it with water to get rid of the bleach and tone, before drying it.
My Positive and negative photogram prints
The film camera - slr (single-lens reflex)
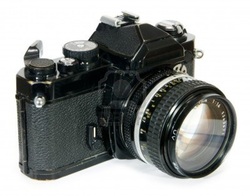
The term SLR refers to the way in which the light passes into the camera lens and allows the viewer to see directly through the lens due to the mirrored 'shutter'. When the shutter release is pressed the mirrored shutter opens and light hits the film for a certain period of time. Therefore, the shutter acts as a mechanism for allowing light to hit the film for a fixed period of time, and it also acts as a viewer.
developing film
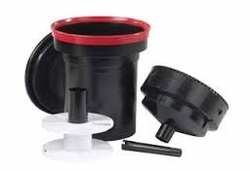
We took 24 photos around and outside school using a SLR camera. Once the photos were taken, we developed them using a developing tank/container (top and lid), a film spool and a spool funnel. Firstly, we took the film out of the camera and transferred it onto the spool (making sure the shiny side faced outwards) in a pitch black room. Once finished, we turned the the top part of the tank into place so the funnel is trapped and turn until you hear a click. Then you can put the lid on and leave the dark room. Then, we poured various liquids and water measuring 300ml into the tank. First, pour the developer into the tank at a ratio of 1:9 of developer to water, and leave it for six and a half minutes, shaking it every minute. Next pour the same amount of stop into the tank, but leave it in for two minutes. Finally, pour the fix in at a ratio of 1:4 of fix to water, and leave it in for one and a half minutes. Then, wash it down with water for ten minutes to get rid of all the chemicals. Lastly, put the film through the dryer to dry it off.
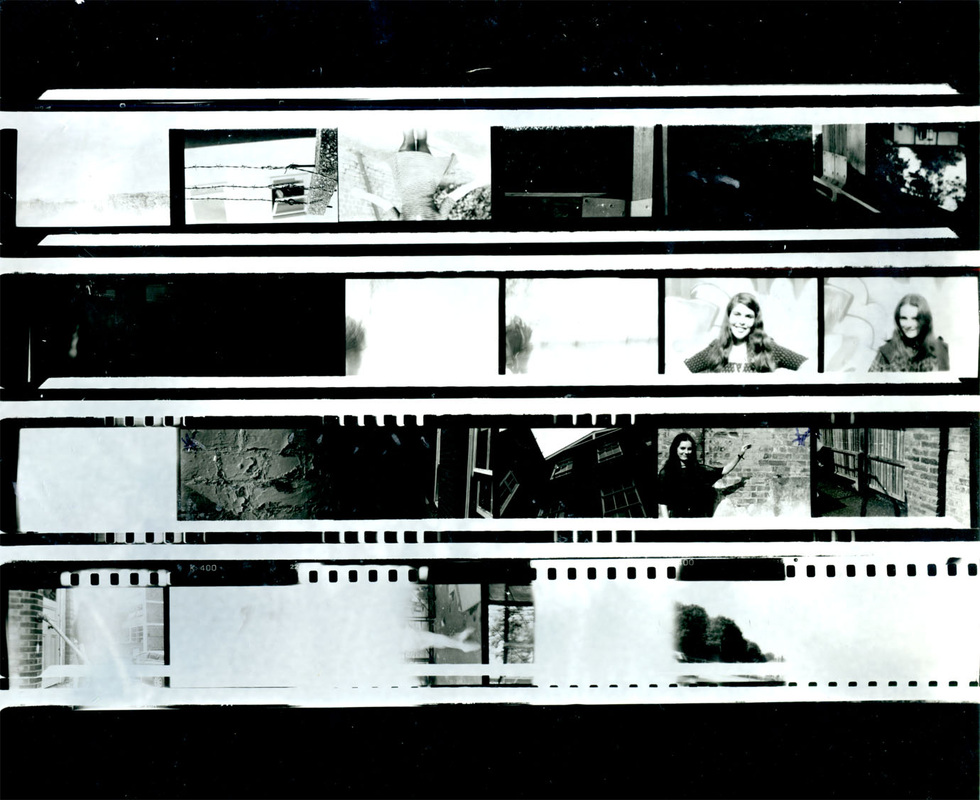
contact sheet
Once the film's been developed, we cut long strip into four individual strips each of six photos. In the dark room, we used the equipment to project the film onto photographic paper just like a normal photogram.
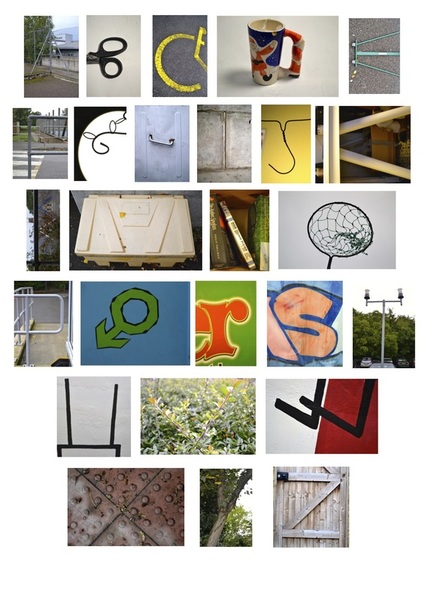
The alphabet using a dslr camera
enlarging one of the photos from the contact sheet
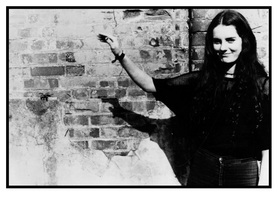
After we made the contact, sheet we enlarged one of the photos. To do this, we put the film in the enlarger, projected it onto the photographic paper and used the same chemicals as usual.
aperture
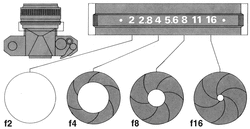
The aperture is the opening in the camera where the light travels through, hence determines how much light is exposed in the shot. The lower numbers, for example f/2.8, is a wider aperture, letting in alot of light which is good in low light situations. The higher numbers, for example f/16, is a smaller aperture therefore only lets in a small amount of light.
Shutter speed
The shutter speed is the length of time a camera's shutter is open when taking a photograph. The amount of light that reaches the film or image sensor is proportional to the exposure time. Short shutter speeds are used to freeze fast-moving objects, whereas longer shutter speeds are used to intentionally blur a moving object. Short exposure times are called 'fast', and long exposure times are 'slow'. The following photos were taken with a fast shutter speed of 1/200 or above. The faster shutter speed allowed a levitating effect.
